> ## Documentation Index
> Fetch the complete documentation index at: https://docs.flowterminal.com/llms.txt
> Use this file to discover all available pages before exploring further.
# Support Level Agent
The **Support Level Agent** is designed to defend key price zones of your token with additional liquidity.\
It automatically places buy and sell orders at strategic levels — either as a fixed percentage from market price or within a defined price range — helping you hold your line when the market tests support or resistance.
Where the Spread and Depth Agent maintains *overall liquidity*,\
the Support Level Agent reinforces *critical levels* — acting as your automated defense system.
***
## Purpose
In every market, there are moments when the token price approaches key zones —\
previous highs, psychological levels, or areas of concentrated volume.\
When there’s no liquidity to back those zones, the market collapses through them instantly.
The Support Level Agent is built exactly for these moments.\
It places liquidity walls at defined distances or price levels and keeps them refreshed.\
This prevents deep drops, supports investor confidence, and makes your token’s market structure visibly stronger.
***
## Dashboard Overview
The Agent operates in two main modes — **Spread Mode** and **Price Mode** —\
each providing a different perspective on how support and resistance levels are structured.
***
### Spread Mode
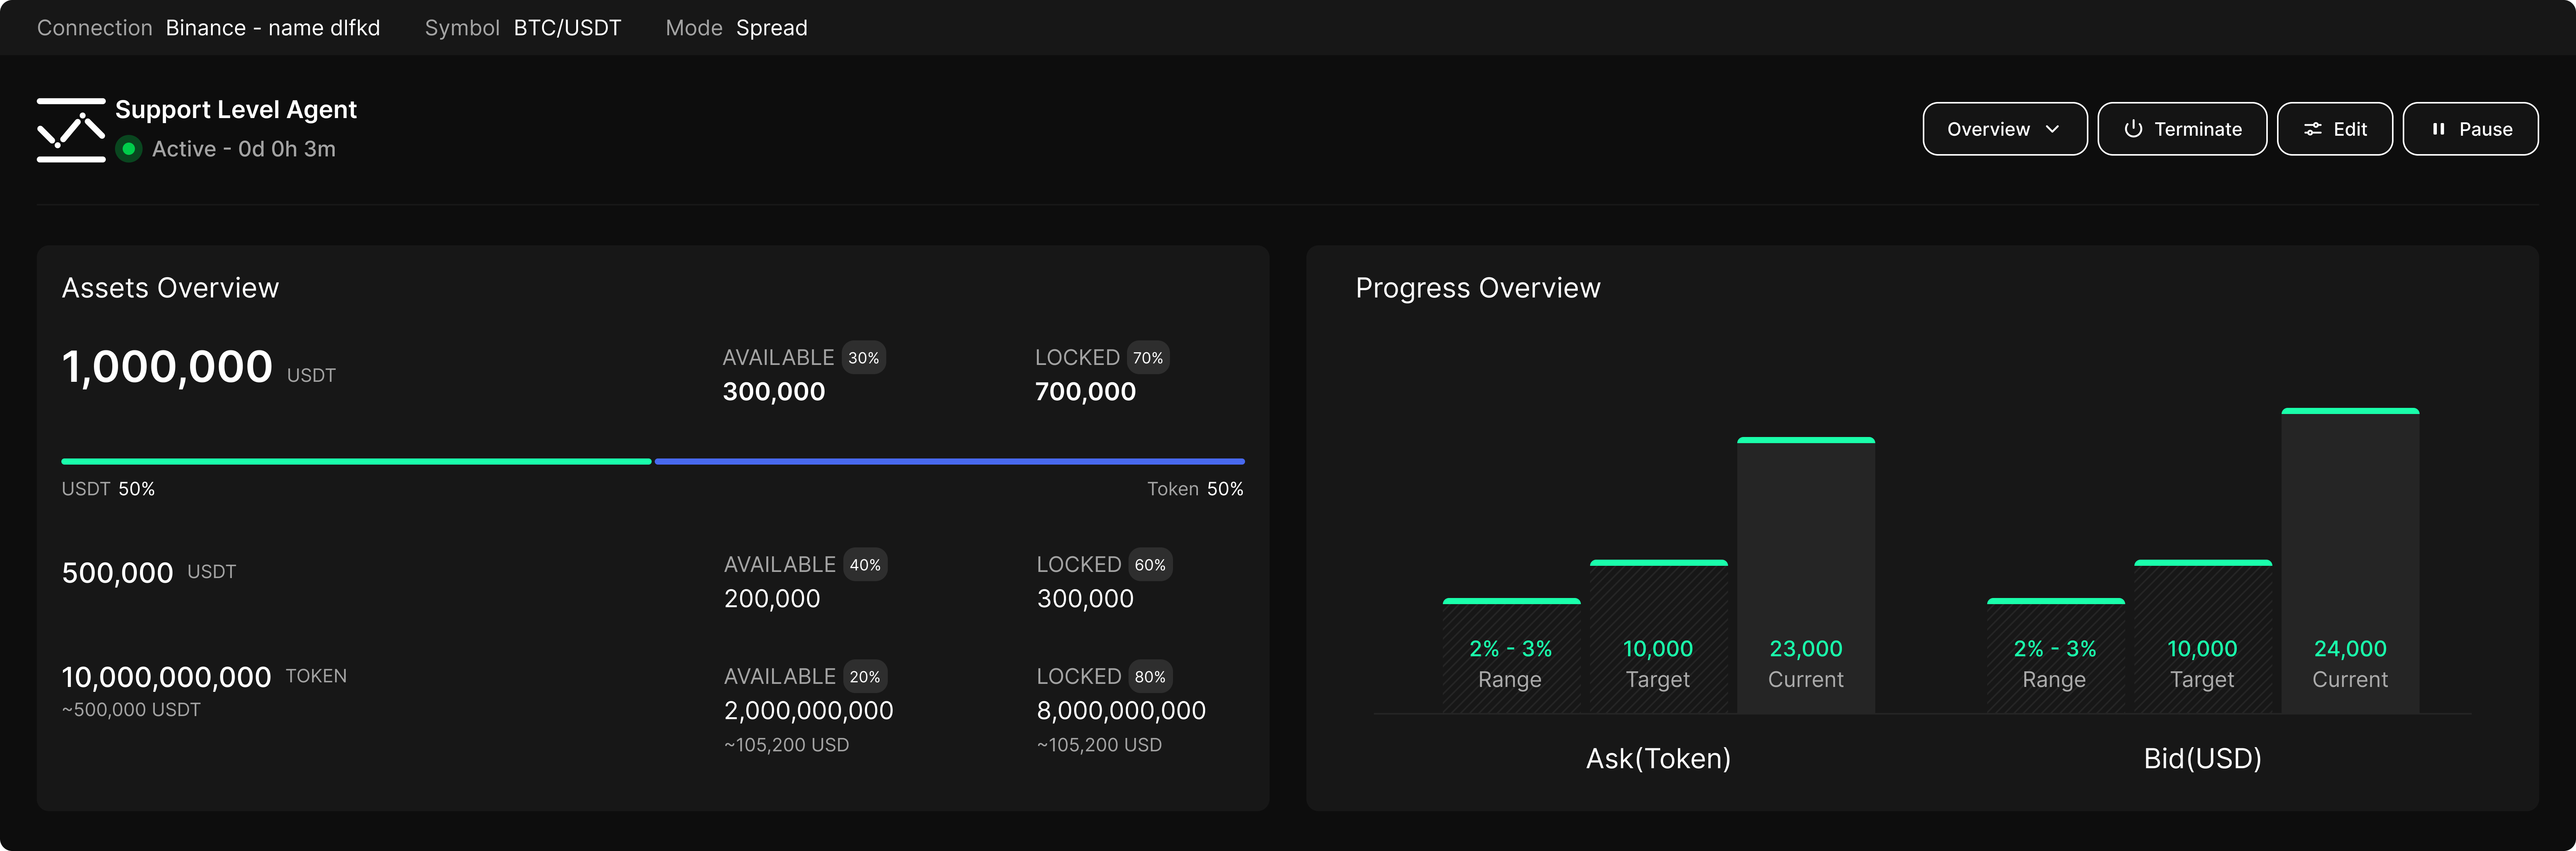 In **Spread Mode**, your agent sets a range — for example, *2–3%* around the mid-price —\
and places both buy and sell orders inside this band.
* **Ask Side (TOKEN)** — the amount of token liquidity offered for sale near the top of the range.
* **Bid Side (USD)** — the quote liquidity supporting the market below the current price.
* **Range (2–3%)** — defines where the agent is active relative to the mid-price.
Within this mode, you define **Target** and **Current** values:
| Metric | Target | Current | Meaning |
| -------------------- | ---------------------------------------------------- | ---------------------------------- | ---------------------------------- |
| **Ask Side (TOKEN)** | How much liquidity you planned to place above market | How much is actually active now | Shows how strong your sell wall is |
| **Bid Side (USD)** | Planned buy-side liquidity | Actual amount supporting the level | Shows how thick your buy wall is |
The **Progress Overview** visually compares these values, letting you see in real time whether your liquidity defenses are as strong as intended.\
If **Current** exceeds **Target**, your wall is holding well.\
If **Current** drops below **Target**, you might be losing support and should check available balances or overall agent conditions.
***
### Price Mode
In **Spread Mode**, your agent sets a range — for example, *2–3%* around the mid-price —\
and places both buy and sell orders inside this band.
* **Ask Side (TOKEN)** — the amount of token liquidity offered for sale near the top of the range.
* **Bid Side (USD)** — the quote liquidity supporting the market below the current price.
* **Range (2–3%)** — defines where the agent is active relative to the mid-price.
Within this mode, you define **Target** and **Current** values:
| Metric | Target | Current | Meaning |
| -------------------- | ---------------------------------------------------- | ---------------------------------- | ---------------------------------- |
| **Ask Side (TOKEN)** | How much liquidity you planned to place above market | How much is actually active now | Shows how strong your sell wall is |
| **Bid Side (USD)** | Planned buy-side liquidity | Actual amount supporting the level | Shows how thick your buy wall is |
The **Progress Overview** visually compares these values, letting you see in real time whether your liquidity defenses are as strong as intended.\
If **Current** exceeds **Target**, your wall is holding well.\
If **Current** drops below **Target**, you might be losing support and should check available balances or overall agent conditions.
***
### Price Mode
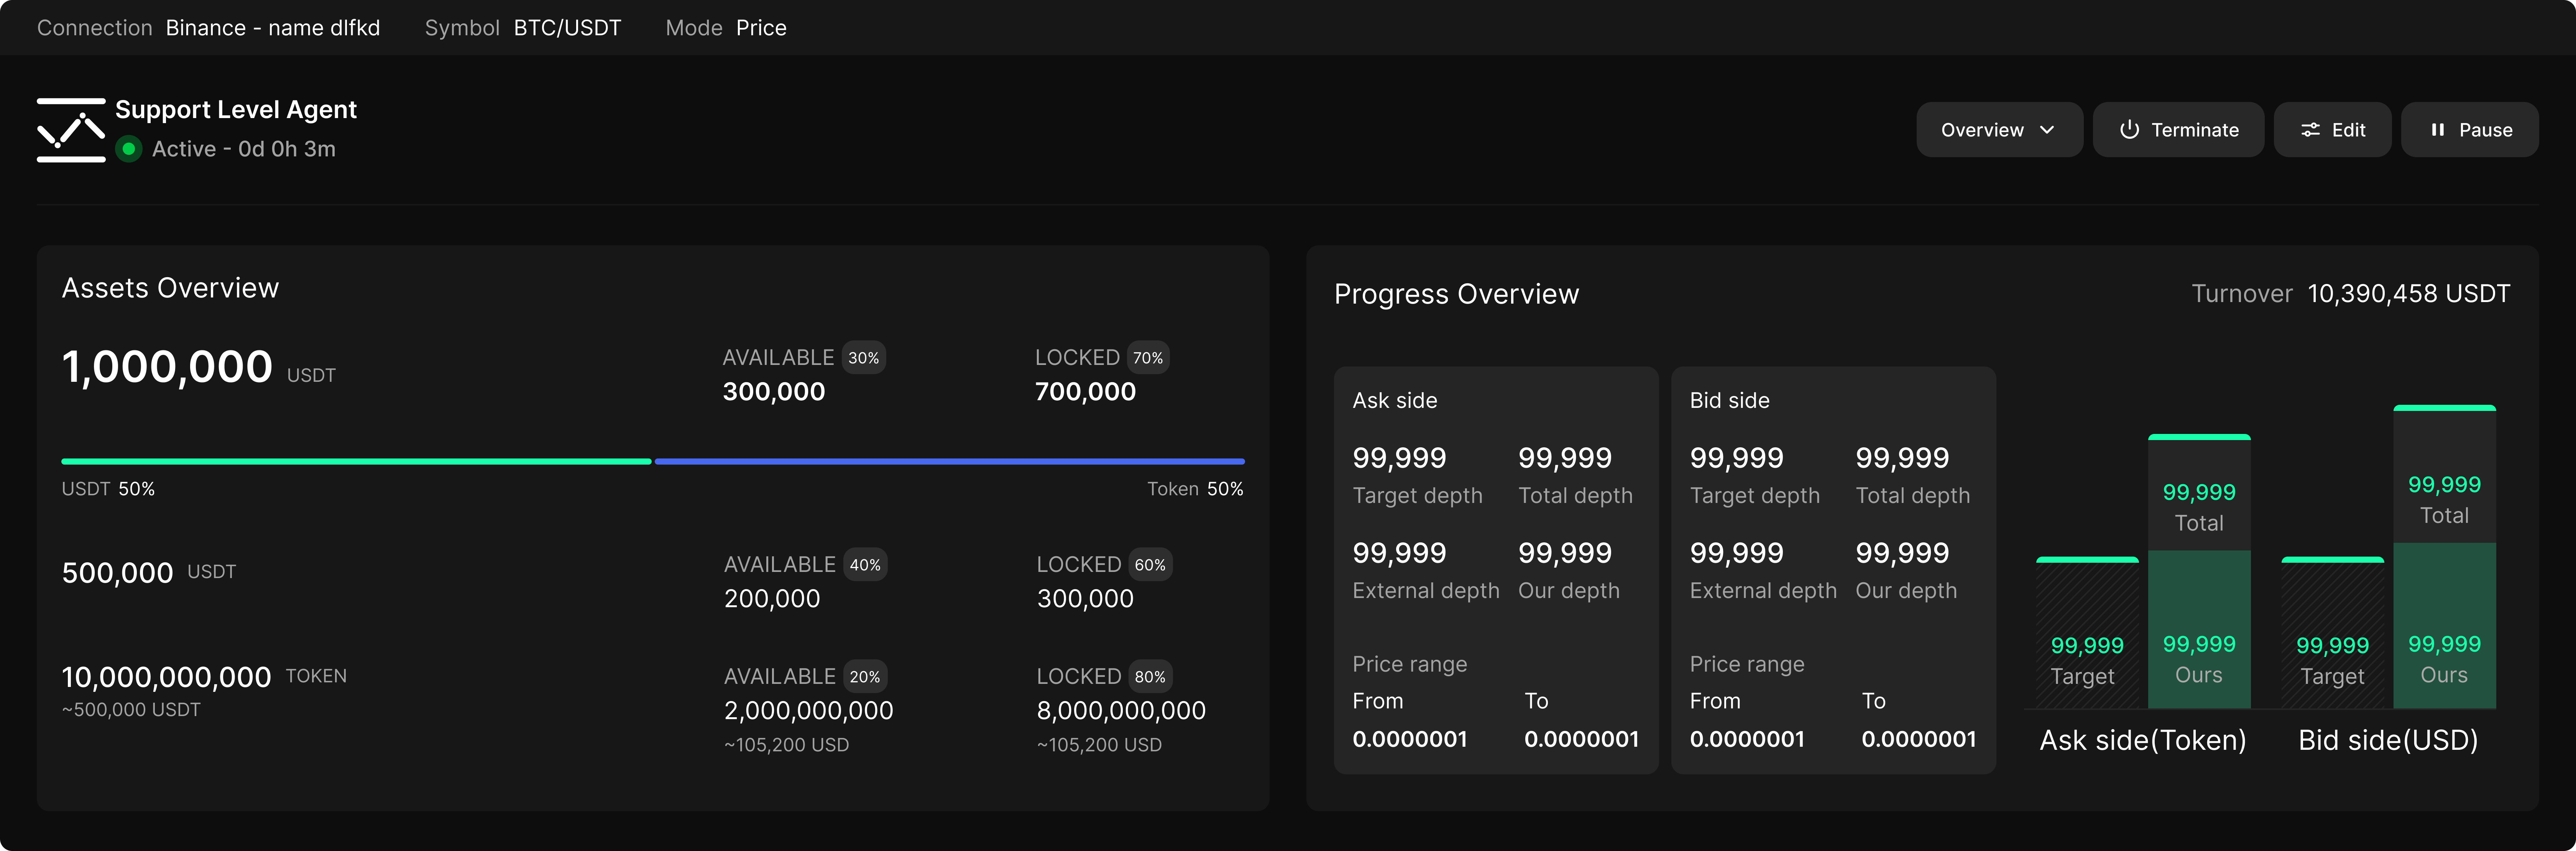 In **Price Mode**, you define *specific price levels* rather than a spread range.\
This is useful for defending historical support levels or round-number price points.
Each side — **Ask** and **Bid** — is analyzed separately:
| Side | Key Metrics | Description |
| --------------------------- | ------------------------------------------------------- | ------------------------------------------------------------------------------------------------------ |
| **Ask Side (TOKEN)** | Target depth / Total depth / External depth / Our depth | Shows how much token volume is offered at the defense zone, and how much of that comes from your agent |
| **Bid Side (USD)** | Target depth / Total depth / External depth / Our depth | Indicates how much total buy liquidity supports your level and what portion is provided by you |
| **Price Range (From / To)** | Start and end of your protected zone | Defines the actual defended price interval |
This dual comparison between *external liquidity* and *your liquidity* helps you understand whether your support walls are the dominant ones in the market, or if you’re complementing an existing structure.
***
## Assets Overview
The **Assets Overview** section works identically across all agents.\
It shows the distribution of your capital:
* **Total balance** — total liquidity allocated to this Support Level Agent.
* **Available** — free funds that can be placed as new orders.
* **Locked** — liquidity currently resting as support/resistance orders.
* **Ratio bar** — visual percentage between quote and base asset allocation.
Keeping an eye on this helps ensure that your agent has enough reserves to rebuild its walls when parts of them are filled.
***
## How It Works
The Support Level Agent continuously monitors your defined range or price level.\
It then distributes liquidity layers within that zone and refreshes them when trades consume part of your walls.
The logic works in cycles:
1. **Define Zone** — the range (percent or price interval) where protection is needed.
2. **Allocate Liquidity** — distribute buy/sell capital within that range.
3. **Maintain Balance** — replace filled orders to rebuild the wall.
4. **Monitor Depth** — compare *Current* vs *Target* and auto-rebalance as needed.
The agent does not predict price movement — it **reacts** precisely and immediately to maintain your defensive structure.
***
## Benefits
* **Defense stability:** holds your key support levels under volatility.
* **Controlled price zones:** creates visible “walls” that traders respect.
* **Predictable behavior:** same configuration yields same reaction every time.
* **Transparency:** visual metrics clearly show strength of both sides.
* **Market confidence:** traders and holders can visually see where liquidity exists.
***
## Reading the Data
When you read the dashboard:
* If **Bid Current \< Bid Target**, your support level is weakening — check balance availability.
* If **Ask Current \< Ask Target**, you’re losing resistance above — may allow overshoot upward.
* If **Range** shrinks too tight, it means market volatility is low — normal; if expands, volatility increased.
* If **External Depth** dominates over **Our Depth**, your walls are backed by other traders — strong sign of shared liquidity.
***
## Practical Example
Suppose your token trades at **1.00 USDT**, and you want to defend **0.97–0.99 USDT** with buy liquidity.\
You set:
* **Mode:** Price
* **Bid Target:** 10,000 USDT
* **Ask Target:** 10,000 TOKEN
* **Range:** 0.97 → 0.99 USDT
Your agent then:
* Places staggered buy orders within that price window.
* Locks \~70% of allocated funds in those levels.
* Refreshes orders automatically when fills occur.
* Shows in Progress Overview:
* **Bid Target:** 10,000
* **Bid Current:** 9,000 → one layer was filled, 10% missing.
* **Ask Target:** 10,000
* **Ask Current:** 11,500 → slight overfill (extra resistance).
You immediately see that support is slightly weaker than target (bids reduced), while resistance is stronger than expected — a sign of upward pressure.
***
## Summary
The **Support Level Agent** acts as your market’s protective structure.\
It ensures that when traders push against critical price zones, your token doesn’t fall through — it absorbs pressure smoothly and rebuilds automatically.
> It’s not about predicting the market — it’s about controlling the battlefield.
In **Price Mode**, you define *specific price levels* rather than a spread range.\
This is useful for defending historical support levels or round-number price points.
Each side — **Ask** and **Bid** — is analyzed separately:
| Side | Key Metrics | Description |
| --------------------------- | ------------------------------------------------------- | ------------------------------------------------------------------------------------------------------ |
| **Ask Side (TOKEN)** | Target depth / Total depth / External depth / Our depth | Shows how much token volume is offered at the defense zone, and how much of that comes from your agent |
| **Bid Side (USD)** | Target depth / Total depth / External depth / Our depth | Indicates how much total buy liquidity supports your level and what portion is provided by you |
| **Price Range (From / To)** | Start and end of your protected zone | Defines the actual defended price interval |
This dual comparison between *external liquidity* and *your liquidity* helps you understand whether your support walls are the dominant ones in the market, or if you’re complementing an existing structure.
***
## Assets Overview
The **Assets Overview** section works identically across all agents.\
It shows the distribution of your capital:
* **Total balance** — total liquidity allocated to this Support Level Agent.
* **Available** — free funds that can be placed as new orders.
* **Locked** — liquidity currently resting as support/resistance orders.
* **Ratio bar** — visual percentage between quote and base asset allocation.
Keeping an eye on this helps ensure that your agent has enough reserves to rebuild its walls when parts of them are filled.
***
## How It Works
The Support Level Agent continuously monitors your defined range or price level.\
It then distributes liquidity layers within that zone and refreshes them when trades consume part of your walls.
The logic works in cycles:
1. **Define Zone** — the range (percent or price interval) where protection is needed.
2. **Allocate Liquidity** — distribute buy/sell capital within that range.
3. **Maintain Balance** — replace filled orders to rebuild the wall.
4. **Monitor Depth** — compare *Current* vs *Target* and auto-rebalance as needed.
The agent does not predict price movement — it **reacts** precisely and immediately to maintain your defensive structure.
***
## Benefits
* **Defense stability:** holds your key support levels under volatility.
* **Controlled price zones:** creates visible “walls” that traders respect.
* **Predictable behavior:** same configuration yields same reaction every time.
* **Transparency:** visual metrics clearly show strength of both sides.
* **Market confidence:** traders and holders can visually see where liquidity exists.
***
## Reading the Data
When you read the dashboard:
* If **Bid Current \< Bid Target**, your support level is weakening — check balance availability.
* If **Ask Current \< Ask Target**, you’re losing resistance above — may allow overshoot upward.
* If **Range** shrinks too tight, it means market volatility is low — normal; if expands, volatility increased.
* If **External Depth** dominates over **Our Depth**, your walls are backed by other traders — strong sign of shared liquidity.
***
## Practical Example
Suppose your token trades at **1.00 USDT**, and you want to defend **0.97–0.99 USDT** with buy liquidity.\
You set:
* **Mode:** Price
* **Bid Target:** 10,000 USDT
* **Ask Target:** 10,000 TOKEN
* **Range:** 0.97 → 0.99 USDT
Your agent then:
* Places staggered buy orders within that price window.
* Locks \~70% of allocated funds in those levels.
* Refreshes orders automatically when fills occur.
* Shows in Progress Overview:
* **Bid Target:** 10,000
* **Bid Current:** 9,000 → one layer was filled, 10% missing.
* **Ask Target:** 10,000
* **Ask Current:** 11,500 → slight overfill (extra resistance).
You immediately see that support is slightly weaker than target (bids reduced), while resistance is stronger than expected — a sign of upward pressure.
***
## Summary
The **Support Level Agent** acts as your market’s protective structure.\
It ensures that when traders push against critical price zones, your token doesn’t fall through — it absorbs pressure smoothly and rebuilds automatically.
> It’s not about predicting the market — it’s about controlling the battlefield.